Monday, 25 July 2016

DIY Felt Memory Board 自制不织布记忆板

Playing Mandala Training Games recently and little girl looks interested in memory training game. Making use on what i had on hand, i made this DIY Felt Memory Board for her. And what we need to make it is just Felt material and Velcro~

最近我们都有在玩Mandala记忆游戏,小人儿看起来很喜欢。但是我又不想继续使用打印教材,所以制作了这个自制不织布记忆板。使用的材料很简单,就是不同颜色的不织布及魔术贴而已。


Material : Felt and Velcro

You may get all the materials from here : SHOP


★ Prepare felt board as in picture. You may decide number of columns according to the difficulty level that suit to your little one. I prepared a nine columns board for my little one.
★ Cut felt in various colors into round shape and actually it can be in any shapes that you like.
★ Stick velcro onto each columns and it is ready to play. Prepare two set, one is for parents to prepare the question, and another is answer sheet. And you may start your game anytime. 😊

这个记忆板的所需要的材料很简单,就是不织布及魔术贴而已 (材料可以从这里购买:SHOP )

记忆板是利用不织布裁出,然后我只是很简单的用笔将格子画出。比较讲究的妈妈们可以用线缝出格子。至于要有多少格呢就是根据各自所需难度来决定。以上记忆板需要两份,分别作为题目板及作答板。每个格子内再贴上魔术贴,这个在游戏进行时固定记忆棋子。

另外将不同颜色的不织布裁成圆形作为游戏棋子,如图。也可以是任何形状。根据个人喜好就可以。

就这么简单啦~

How to play:
1. Parent set the question and let children to view for 5-10seconds.
2. Close the question card and let children to answer.
Let's do brain exercise together~

游戏如何进行:
1. 家长将题目设置好后让孩子看5-10s。之后题目板盖起来。
2. 让孩子开始作答再对答案。
一起做做脑部运动吧。 


** Velcro are good to attach Pom Pom Balls as well, you may use Pom Pom Balls to make it more interesting! :)


** If you don't have any Velcro may just directly put the pom pom balls or felt dots on the board. But of course using Velcro will make it easier to use as it will create good bonding with felt and pom pom balls as in picture below.

Remember, using hooks surface for this attachment function ya!


Copyright © 2016 Ibabiesclub @ www.ibabiesclub.blogspot.com

All Rights Reserved | NOT for Re-sale | Files are for personal use ONLY | Please share the link to the blog and NOT the files, Thank You! And for others resources that we get from others, we already linked it to the original post | Thanks all for sharing!
教材里面有些图片是取自网络,所以我们的打印教材只供个人用途,不能够转售或作商业用途~欢迎分享我们的教材,但是记得是连接到我们的部落格或面书,而非直接连接至教材哦~谢谢当中我们也提到了一些很好的资源,我们已经在文内直接连接至资源本文啦!也谢谢大家的分享! ^^

Saturday, 16 July 2016

Preschool/Toddler STEM Activities (Part 1)

STEM = Science Technology Engineering and Math

Kids love finding out how things work through fun, hands-on projects. And thanks to sharing from creative parents/teachers all around the world, we able to carry on simple STEM activities to our toddlers at home. And here with 5 STEM activities that we went through recently. 

其实从来没有想过要和小朋友进行有关科学书里工程相关的活动,毕竟像对我来说,我也是在中学时期才上科学课呀~很感谢网络的发达,让我认识了STEM这个词汇,然后去研究一下到底可以和小朋友们进行什么和STEM相关的游戏呢?然后从网络家长/老师们热情的分享,慢慢的也开始了我们的STEM Activities. 以下先附上其中5个。

1. Math : Simple Toddler Addition Station ✪ 简单自制的加法箱


可以提供不同小物品和夹子同时进行小手锻炼

Exposure to addition
☆preparation : Addition Bin as in above picture, any counters that you have (as long as can put inside the toilet roll will do), question cards


主要是让孩子看看什么是“加” 。孩子要根据题目卡分别置入相等的物件。然后从“等于箱子”里观察答案。


Get question card and prepare Castor Beans in equal quantity
根据题目卡准备相等数量的橡胶种子
 
Move the Caster Beans into Equal Bin
将准备好的橡胶果实移入等于箱

count for the answer
数数共有多少

"Equation Bin" , children can get the answer from this bin.
提供答案的“等于”箱子


2. Science : Magnets Play ✪ 磁性和非磁性实验

☆ to test whether an object is belong to magnetic items or not
☆prepared few types of material (stones, steel ring, pom pom balls & etc) and put inside colorful eggs separately
☆ use a magnetic stick to test
☆ record the result


☆将不同性质的物品置入不同彩蛋内,然后进行 magnetic test
☆也开始记录我们的科学小实验结果(看见 Mummy Folvin Goh 感性的分享说,日后这本 journal会是她和孩子的回忆,我马上也找机会来做一本~)


Testing
测试中


A sad face for Non-Magnetic items
在属于非磁性物品的格子内画个伤心的脸


Record for future reference
记录一下,日后可以慢慢回味

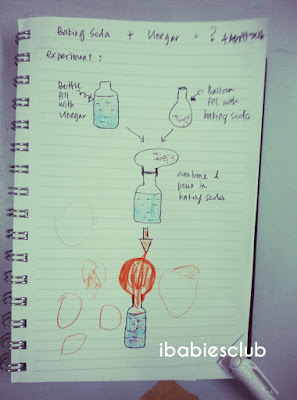
3. Science : Reaction between Baking Soda and Vinegar ✪ 看看 醋+baking soda 会产生什么?

Material List: Baking Soda , Vinegar, empty bottle, balloon

Instructions:
→ fill empty bottle with vinegar
→ fill balloon with baking soda [two to three TBSP will be enough]
→ attach balloon to bottle and slowly pour in baking soda
→ enjoy the magic moment!


十分好玩的孩童科学实验
看看 醋+baking soda 会产生什么?
方法如上。材料简单,看到气球膨胀起来小朋友却是非常兴奋~


Prepared material following instruction in Science Journal
根据科学记录簿里的简单指示准备材料

Poured in baking soda

Magic!

Record done by little girl and "touch up" by mummy
让小朋友自行记录,当然,妈妈还是需事后稍微修复一下

4. Math : greater than, less than, equal to ✪ 大于,小于,等于


☆ prepared two mini containers for each group of number to put in water beads in same quantity as in question cards


Prepared two mini container for the number, toddler can observe the actual quantity instead of looking at number only.
准备两个小盒子来放置相等数字的物件,小朋友可以从中观察事物。

A big mouth is for group with more objects!
嘴巴是朝着多的那方打开的


4. Milk Art ✪ 简单牛奶艺术画


Milk Art (which to use up our expired milk)
Material list:
※ Milk
※ food coloring
※ dish soap (mixed with small amount of water)
※ cotton buds/Q tips
※ any shallow container, i used baking tray


1. Pour milk into the container.
2. Add in food coloring onto the milk.
3. Dip cotton bud in dish soap.
4. Finally touch the food coloring which on milk surface and you may see the magic art between the reaction with dish soap and milk.


**
Simple Science Behind Magic Milk Art
Milk is made up of vitamins, minerals, proteins and fats. When the soap is added to the milk is breaks apart the protein and the fats. The soap heads for the fats creating the cool bursting of color. When there is no more movement, all the fat molecules have been found. Are there any more hiding? Try another q-tip dipped in soap! 
source : littlebinsforlittlehands
**

简单牛奶艺术画
终于‘盼到’过期牛奶了,赶紧就来进行这个牛奶艺术画实验。
所需要是用具有:
※ 牛奶
※ 食用颜料
※ 棉花棒
※ 洗碗剂(加些清水混合)
※ 棉花棒
※ 一个宽而浅的容器
1. 将牛奶倒入容器。然后随意滴上颜料。
2. 棉花棒一端沾上洗碗剂。
3. 用沾有洗碗剂的棉花棒触碰混入牛奶内的颜料。这时你就可以看到在颜料漂亮的瞬间变化。
小人儿在进行时一直说,哇,好美啊!还说,妈妈你很厉害~其实妈妈也是抄来的啦!感谢网络发达让我们大家都可以在家进行简单有趣的实验! 


Materials


Copyright © 2016 Ibabiesclub @ www.ibabiesclub.blogspot.com


All Rights Reserved | NOT for Re-sale | Files are for personal use ONLY | Please share the link to the blog and NOT the files, Thank You! And for others resources that we get from others, we already linked it to the original post | Thanks all for sharing!
教材里面有些图片是取自网络,所以我们的打印教材只供个人用途,不能够转售或作商业用途~欢迎分享我们的教材,但是记得是连接到我们的部落格或面书,而非直接连接至教材哦~谢谢当中我们也提到了一些很好的资源,我们已经在文内直接连接至资源本文啦!也谢谢大家的分享! ^^


Wednesday, 6 July 2016

BAS027 Moon Festival - DIY Lantern


去年我们推出了认知月亮的各种名称,及中秋的一小段故事。
为了延续我们中秋节的传统。这次我们新推出了DIY灯笼,可以让小孩和大人一起动手制作灯笼的亲子中秋节游戏。
这个非常好玩及很有趣的一项活动。在题材这个灯笼的时候,我一直想想要如何简单的让孩子自己做一个属于他自己的小灯笼呢?如果他能自己制作会不会有意义得多。那么同时会不会更珍惜他自己的灯笼呢?因为孩子还小,所以要用很简单的步骤让他觉得自己是可以驾驭得到的。所以我就在网上一直寻找了很多关于如何自己制作灯笼,就在一个机缘下让我找到了这个方法。之后就马上赛选和收集一些需要制作的材料。


灯笼所提供的材料
灯笼材料:
灯笼 1个 (20cm)
LED灯泡 1 个
灯笼杠 1 个 (随机色)
创意粘纸 1 份 (随机款)


开始制作啦。亿选了一个小蜜蜂的图案来为大家介绍如何简单制作属于自己的小灯笼。

开始制作他自己说选的小蜜蜂款式灯笼啦。

把局部的部分照着图形黏贴起来。

之后吧部分的小蜜蜂造型连接起来。

把小蜜蜂依顺序贴在灯笼上。

把小蜜蜂一一连接起来,组成一只小蜜蜂。

登登登。。。 小蜜蜂图形完成啦。
最后如果孩子喜欢画画也可以在灯笼上创造属于他们喜欢的团或为小动物们添加一些色彩也不错哦。
还有要附上小朋友的名字哦,作为一个小艺术家的尊敬。

确保灯泡,灯笼杠,和灯笼交界处扣得稳固。

夜晚中的小蜜蜂灯笼出来啦。完成了。。。成功!
当孩子完成了制作灯笼后,迫不及待的拿给他的啊嫲阿公还有爸爸看。开心的不得了。第一次为自己制作属于自己的灯笼,满足感100哦。

想要订购吗?有兴趣的欢迎PM我们哦。
facebook: ibabiesclub 爱宝贝
有兴趣可以看看另外一个我们设计的 BAS014 moon festival activity pack


Copyright © 2016 Ibabiesclub @ www.ibabiesclub.blogspot.com


~~~~~~~~~~~~~~~~~~~~~~~~~~~~~~~~~~~~~~~~~~~~~~~~~~~~~~~~~~~

If you are interested on this, do email us : ibabiesclub@gmail.com. 若想订购可以通过电邮联络我们哦~

 OR


 just fill in our order form here /你也可以点击这里提交订购单哦 :


Product Code 产品编号: BAS027 Moon Festival - DIY Lantern

Product Price :  RM7.00 ( for each )
RM12.00 ( for 2 )


Courier Fee [Pos Laju, 100g] : WM RM7 ; EM RM10