Monday 30 May 2016

Tot School - Leaf play time


Leaf learning is the tot school with low cost and easy to get the material at your home. I use this leaf to play in 3 games at 1 time.

Now let's we talk about the material
  • Leaf ( I use mint leaf)
  • Paper (recycle paper A3)
  • Color pen
  • Glue

Counting game
First, I draw out 5 numbers with simple frame to separate by each row. Let him to follow by the row do counting and put the quantity leaf with the row number are showing.  
Purpose of this game is for him to recall the counting and number.


Place the leave game
First I draw a simple flower shape. So ask him use the glue to stick the leaf follow by the real place.
Purpose of this game is for him learn from imagination, hand-eye coordination, and help the leaf paint glue.


Make a TREE
I draw a tree without leaf and ask him use the leaf to make a tree.
Purpose of this game is for him do the imagination.


Sunday 22 May 2016

Tot School - Learn my Montessori Transport 3 part card


This idea is come from Chen's mummy sharing with me and I do research for what is Montessori 3 part cards. I found that Montessori 3 part cards is really useful to guide my boy for the 1st learning. Even 1st time play he able to remember for the 1st stage transport.

Inside I had prepare 15 different transport Montessori 3 part cards and separate in 3 teaching times. For my own experience, if too many teach together my children will feel confuse and not interesting play on that.

这个想法是来自晨妈妈,在当中我有上网找寻一番什么是蒙特梭利3份卡。然后我发现这个蒙特梭利3份卡是一个很好玩也很容易让孩子记得每一个交通的样子和名字。即使是第一次玩,都能够记得和分辨个别的名字。

在这里我画了15不同的交通工具蒙特梭利3份卡,同时分别3次进行这游戏。因为我之前的经验告诉我说,太多的新东西一起进行其实会很容易混淆他们。


Part 1. One of the Montessori 3 part cards
Part 2. One of the Montessori 3 part cards

Part 3. One of the Montessori 3 part cards

Part 4. Puzzle to recall the transport by the following

 First show the part 1 and let them do match together with the part 2 & 3.
Option 1. 3 step play time

Once done for the Option 1, then can be try on next Option 2.
start show the picture only (part2). Then let them do puzzle game and choose the name (part3).
End up compare and do correction.
Option 2. 4 step play time

First, let them to see the real picture then only proceed puzzle games.
Play my time


Wednesday 18 May 2016

阶段性学习剪刀 (附上商品介绍: TM004 & TM005)

日前在OT's Diary-play & learn里读到关于幼儿使用剪刀的文章分享,觉得很贴近小人儿学习使用剪刀的过程。在这里我转载OT's Diary-play & learn分享


阶段性学习剪刀

阶段一: 学习如何正确握剪刀
正确握剪刀的方式可参考:
https://www.facebook.com/1635635539991685/photos/a.1637280049827234.1073741828.1635635539991685/1715898178632087/?type=3&theater


阶段二:操控剪刀(开合动作)
当孩子学会如何正确地握剪刀后,就能够开始练习操控剪刀——开合剪刀。初期,家长可以辅助孩子,协助张开的动作,这样孩子就只需要出力按压剪刀即可。此外,也建议使用“会自动打开”的剪刀,以增加孩子的成功经验,避免因挫折感而对剪刀感到无趣。
*利用其它的工具,如镊子、手握打洞器等等练习开合动作。


♥ 个人经历:一开始我提供没有自动打开的安全剪刀,小人儿在使用初期非常容易放弃。后来终于找到了有自动打开功能的剪刀,小人儿使用后慢慢上手。也因此她知道剪下后其实还需要打开这个动作才能继续剪。从这里我才明白使用正确的工具比较容易引导小朋友学会某项技能。

阶段三:动手剪剪粘土吧~
还未开始剪纸前,可以先剪剪粘土哦~ 让孩子将粘土搓成长条后再用剪刀剪(可以玩一些简单的假装游戏,让活动更加有趣哦~)。这时需要到双手协调的能力。初期,家长可以辅助非惯用手握着粘土(并非帮孩子拿着,而是握着他的手,但粘土仍旧是由他拿着的)。
*注意握剪刀的手,拇指需要向上哦,前臂在正中的位置~


阶段四:开始剪纸张咯!
记住,稍厚的纸(如杂志封面,或将两张纸黏在一起等)比薄的纸更简易哦!(因为稍厚的纸的稳定性较好,所以孩子可更专注於剪刀的操作)因此,刚开始学习剪纸时,可以使用较厚的纸。除了剪纸外,可以让孩子将剪下的纸贴在纸上,也可以借此学习操作胶水哦~
*尽量不能让孩子用剪刀撕纸哦!


♥ 个人经历:记得提供较厚的纸给刚开始学习剪纸的小朋友,薄的纸会在剪的过程中不断摇摆继而影响小朋友剪纸。小人儿在开始学习剪纸时也因为这样而放弃继续剪纸。后来我改用纸卡后明显的容易许多。

阶段五:剪直线
当孩子已经学会剪纸后,就可以开始剪直线咯。孩子开始学习控制剪刀的方向性,让剪刀维持在线上。此时,操作纸张的非惯用手仍较多在固定作用。
画在纸上的直线可以画得稍粗(用麦克笔画)


阶段六:剪曲线
这个阶段孩子需要学习操控纸张(转动纸张以让剪刀持续在线上)。孩子在控制剪刀开合的动作更加纯熟(一般只需半开剪刀,才能更顺畅、减少锯齿状出现)。


阶段七:剪剪形状
这时,可以让孩子剪剪圆形、方形等。在儿童发展阶段里,圆形比起方形更早哦~ 可以让孩子将剪好的形状贴成更种图形(如人、太阳、花、屋子等),让剪纸活动更有意义哦。


阶段八:剪复杂图形
这时,孩子可以剪更多复杂的图形哦!


-   -   -   -   -    -    -    -   -   -   -   -   -   -  -   -   -   -    -   -   -   -   -   -   -  -    -   -

也因为这样,其实我在让小人儿学习使用剪刀的过程也买过几款不同的剪刀来让小人儿学习。综合整个过程,我觉得在开始学习的阶段我们可以--> 提供比较容易控制的工具包括有自动打开功能的剪刀及比较厚的纸卡。或者是让小朋友先尝试剪粘土也是鼓励性的尝试。在有利的工具辅助下,孩子们比较容易成功继而鼓励他们继续学习使用剪刀。当孩子渐渐上手后,其实使用普通剪刀也就没有问题了。

这里也分享爱宝贝售卖的两款剪刀:

在开始阶段如果担心刀片部分会割伤孩子,那么可以选用这款塑料剪刀。这款剪刀也同时具备自动打开功能,操作起来即安全又简单。这款剪刀在最早期的练习中,我多是让孩子用在剪粘土。主要是给孩子感受剪刀的操作,并适应剪纸动作。
TM004 Plastic Child Safety Scissor

进阶款: Maped Spring Scissors

一样具备了自动打开的功能,但是如同以上的那把Plastic Child Safety Scissor,调节Spring的部分后也可做普通剪刀使用。刀片部分已经是铁片,可以剪纸张以外的东西如不织布等。适合已经能安全使用剪刀的孩子。

这款剪刀其实是我无意中从百货公司大减价中买回来。结果小人儿非常喜欢(使用起来非常容易),当然造型也很可爱。之后在厂商那里也看到了这款就一并带入。
TM005 Maped Spring Scissor
  

**updated on 25-May-2016

之后联络上了OT's Diary-play & learn的负责人洁颖,也感谢负责人看了我们部落格内容后给予宝贵意见。OT's Diary-play & learn的负责人并不是太鼓励使用塑料的安全剪刀。因为一般这种剪刀较不锐利,对于刚开始学习使用剪刀的孩子可能更加困难,这样除了造成挫折感外,也会养成小孩用剪刀撕纸的情况。所以建议用铁片,但不是太力的剪刀。还有,练习时最好还是有家长陪伴。


~~~~~~~~~~~~~~~~~~~~~~~~~~~~~~~~~~~~~~~~~~~~~~~~~~~~~~~~~~~

If you are interested on this, do email us : ibabiesclub@gmail.com. 若想订购可以通过电邮联络我们哦~

 OR


 just fill in our order form here /你也可以点击这里提交订购单哦 :


Product Code 产品编号: TM004 Plastic Child Safety Scissor   RM2.50/pcs
or
Product Code 产品编号: TM005 Maped Spring Scissor    RM9/pcs 


Courier Fee [Pos Laju, 30g] : WM RM7 ; EM RM10

Thursday 12 May 2016

BAS026 Time Telling Activity Pack 认识时间活动配套

Time telling is one of the "must" do parts for parent to guide children to understand the concept of time and able to tell time as eventual aim. And so do we. To let our children learning through fun ways , we designed some file folder games, crafts and activities to make the learning process in easier way. And below are details.

掌握时间的概念及学会看时钟对孩子们来说是非常重要的一环,毕竟这是我们日常生活不可分割的部分。在尝试教导我们的小人儿们学看时钟及掌握时间概念的同时,我们也设计了一系列的file folder games,手工及活动以让小人儿们轻松学习时间概念。以下为详情。

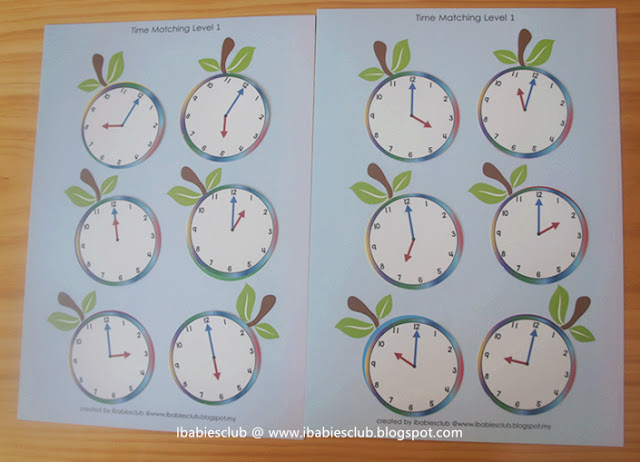
a. Time Telling File Folder Game Level 1

Starting from basic, we have telling time to the hour activity which children need to match digital clock to the analog clock that shows the same time. 
从简单开始的话,我们有这个时间配对file folder game。Level 1里先学习小时,就是一点钟,两点钟等。孩子们需要将指针式时钟和数字时钟做配对。

Material List 商品详情:
2pcs A4 size file folder sheets               两张A4尺寸活动纸卡
12pcs analog clocks in diameter 65mm   12张直径65mm的指针时钟


Time Telling File Folder Game Level 1

Matching in progress

Done

b. Time Telling File Folder Game Level 2

Further from activity level 1, we continue with telling time to half hour activity which children need to match digital clock to the analog clock that shows the same time. 
接下去,我们继续学习半小时的时间。Level 2里是学习半小时,就是一点半,两点半等。孩子们需要将指针式时钟和数字时钟做配对。

Material List 商品详情:
2pcs A4 size file folder sheets               两张A4尺寸活动纸卡
12pcs analog clocks in diameter 65mm   12张直径65mm的指针时钟


 Time Telling File Folder Game Level 2

c. Clock Craft

Simple make a clock craft with one round clock (parent need to cut out by own), clocks hands (hour and minute) and a brad to combine clock with its hands.

You may notice that we create a hour portion for the clock to show kids that each hour has an area or space that belongs to them. You can show them that when the short hand (minute hands) is in the number’s room, that’s the hour. Anyway, this is inspired by ainsleelabs , you may check their website for details.

简单的自制时钟,内容有一个圆形中(需自行裁剪出来),时针,分针及一个用来装配的两脚钉。

有别于一般的时钟面,我们增加了”小时空间“在这里。这样,孩子可以清楚了解到,当时针处于,比如说三的空间,那么现在的时间就是三点多。否则的话,当时针处于三和四之间时,孩子们通常会觉得很困扰,到底是三点还是四点呢?有了这个就可以大幅度减低视觉辨别上的困扰。以上资料源自这里:ainsleelabs 


Cut out the clcok and hands.
将时钟,时针,分针都裁剪好。

Combined all the parts with brads and done
用两脚钉把所以时钟配件都结合在一起就好了


Tips: For safety purpose, fold each brad point backwards on itself, and then flatten them with a hammer. You may paste transparent tape (or any color tape) on it for further prevention.
温馨提醒:这个部分很容易割伤孩子,你可以用锤子将它弄平来减低危险程度。之后也可以贴上胶纸来做更好的保护工作。

d. Clock Craft 02

Furthering from above basic time telling clock, we have below DIY clock to show how to convert analog time in minutes to digital reading.

For example : a quarter past one , you may lift up minute part on analog clock then you can see that 3 (in analog) is equal to 15 in minutes.

And one hour = 60 minutes

当孩子掌握了基本时间概念后,我们可以制作以下这个时钟,主要是让孩子知道如何转换钟表指针时间去相应时间。比如,一点半,分针在六,那么是几分钟呢?只要 把六掀开,孩子就可以看到6是等于30分钟。然后当分钟走完一圈就等于60分钟。


parent need to cut out all the parts by own
家长需自行将这些配件裁剪出来


Lift up the number on front clock then children can know the reading in digital way.
将表面的数字掀开就可以知道这个数字等于几分钟了。

1 hour = 60 minutes

e. DIY Digital Clock

To help children to learn time telling in interesting way, we created DIY Digital Clock as well. Which each set included:
✔ 12pcs hour cards     50mmx50mm
✔ 12pcs minute cards     50mmx50mm
✔ digital clock base     135mmx65mm
✔ 10pcs owl design time telling cards     110mmx23mm

这个配套也包括DIY电子时钟配套,配套里面有:
✔ 12张小时卡    50mmx50mm
✔ 12张分钟卡    50mmx50mm
✔ 一张电子钟卡     135mmx65mm
✔ 10张猫头鹰时间卡      110mmx23mm


You may let elder children to match the digital clock with provided owl cards.
若是大一点的孩子,我们就可以让他们根据猫头鹰时间卡在电子钟上配上正确答案。


If they still can't read? No worry, parents can read out the time for them and they just build on answer. :)

如果小朋友还不会阅读的话,那么父母可以念出题目,然后孩子就配上答案。


And of course, our analog clock may assist them to get the answer. :)
当然,配合之前的DIY时钟就更容易掌握啦~ 


Copyright © 2016 Ibabiesclub @ www.ibabiesclub.blogspot.com


~~~~~~~~~~~~~~~~~~~~~~~~~~~~~~~~~~~~~~~~~~~~~~~~~~~~~~~~~~~

If you are interested on this, do email us : ibabiesclub@gmail.com. 若想订购可以通过电邮联络我们哦~

 OR


 just fill in our order form here /你也可以点击这里提交订购单哦 :


Product Code 产品编号: BAS026 Time Telling Activity Pack

Product Price :  RM42


Courier Fee [Pos Laju, 250g] : WM RM7 ; EM RM10

Wednesday 4 May 2016

Tot School : 七田真记忆训练: 曼陀罗卡片 Photographic Memory training with Mandala

在网络看见妈咪Wai Wai分享Mandala的照片。看起来很有趣,然后我就开始寻找资料,才发现那是七田真右脑开发的训练之一。除了曼陀罗卡片外,其实还有其他训练。但是网络的资料也不是很完整,我也是大概了解。只是觉得这个曼陀罗卡片记忆训练游戏很有趣,就开始自行根据资料提供的概念制作了一些图。


以下为我在网络上找到曼陀罗卡片的资料分享:


曼陀罗卡片是由红、黄、蓝、绿四种颜色组成的一组对称图形。是激发右脑训练的一种方法。
只需准备题目纸,空白答案画纸,及四支颜色【红,黄,蓝,青】笔即可

所谓的曼陀罗训练就是紧盯着曼陀罗图,记住每个曼陀罗的形状和颜色,然后在记忆里再现的一种训练方法.这种方法能激活右脑.

如果紧盯着曼陀罗图看10秒钟,然后闭上眼睛,就能够在想象里栩栩如生地再现曼陀罗的颜色和形状,这就证明你的右脑想象能力已经被开启了.如果继续做这种练习的话,很自然地就能开发出你的右脑想象能力

下面是曼陀罗图练习的具体操作方法:

(1)请连续盯着曼陀罗图.


(2)5秒后闭眼5,同时暗示自己在闭眼睛时让图像尽可能长时间地停留在眼前.睁开眼后,看图背面的黑白曼陀罗图像,并将它颜色回忆出来.


(3)训练的关键是要持续不断,至少要用3个月

在进行这个训练前,我从家里的玩具里找到类似的训练卡片。然后赶紧和小人儿一起玩,结果发现,要记忆图像其实不容易。那么我们的右脑可能真的要被训练一下才会被激活吧~

无论如何,我不是这方面的专家,也没有去深入研究。单纯的觉得这个游戏很好玩,可以同时锻炼观察及记忆能力,当然也同时打发一下两母女的居家时光。小人儿挺有兴趣的,如果你也有兴趣可以在这里下载我参考网络资料自行准备的记忆小游戏。[再次强调,我并非专业,只是把这个活动当作游戏进行,如果有不对的地方也欢迎大家指导 :) ]

如果你也想尝试,可以在这里下载。


* 资料更新(updated on 5-May-2016):
谢谢妈咪Pang Siew Ling的分享。Mummy Pang建议说,可以让孩子进行检查答案,那么效果会更加好。Mummy Pang也建议我去YouTube找资料,以下是我找到的。真的很谢谢Mummy Pang的纠正。 :)

根据视屏里面的做法,是在作答时不需上色。视屏内的孩子只是将正确颜色写上(不会写的孩子可能就用对的颜色做个记号)。完成后,检查答案。在正确答案旁边打勾勾即可。


Copyright © 2016 Ibabiesclub @ www.ibabiesclub.blogspot.com

All Rights Reserved | NOT for Re-sale | Files are for personal use ONLY | Please share the link to the blog and NOT the files, Thank You! And for others resources that we get from others, we already linked it to the original post | Thanks all for sharing!
教材里面有些图片是取自网络,所以我们的打印教材只供个人用途,不能够转售或作商业用途~欢迎分享我们的教材,但是记得是连接到我们的部落格或面书,而非直接连接至教材哦~谢谢当中我们也提到了一些很好的资源,我们已经在文内直接连接至资源本文啦!也谢谢大家的分享! ^^