Showing posts with label 爱手作. Show all posts

Wednesday, 9 September 2015

DIY Light Box

Finally started up my DIY Light Box project ( which i delayed for about 2 years XD). I stucked on two issues that i can't solve:
 
1. I don't want a lighting source which got long wires. I hope this light box is "on the go" type, which i can move it to any suitable point.
 
2. I don't have any accessories which is transparent based.
 
Due to above reasons, i just leave it aside until i finally came out with ideas to solve above problems. Yes, i spent about 2 years to solve simple problems! LOL~
 
Ok, here is what we need to for simple DIY Light Box:
 
★ Plastic Bin with lid
☑ try to get a lid which with level surface, so that it is easier for you to have your activities on it
☑ size, just based one your personal requirement will do [ i just simply get one ready bin which i found at home]


★ Light source : Portable Torch Light (LED flashlight)
☑ I get mine from Mr.DIY

☑ if you worry the light is too bright from eyes, you may turn the LED side away from the lid (as in picture)


It is just too easy!
 
I started with few simple light box play after done.


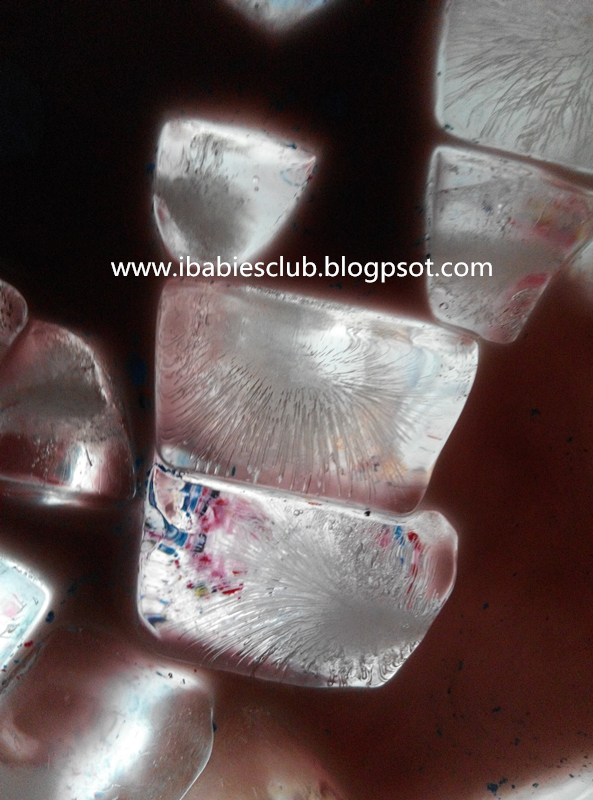
And one of it is ice painting session on light box. I did feel like light box is just something normal, but after this ice painting session, i found it actually help for observation. As for example, the ice structure or even the color mixing process is much more clearer and focus when we observed through the light box~


 It is so interesting, and i must prepare more activities for it. :)
 
很简单的DIY Light Box分享。
 
其实这个DIY灯箱我大概两年前就想制作,可是困在两个问题:
1。我不想用圣诞树的LED灯,因为这样的话就需要在电源插座附近才可以进行。我想我的灯箱可以容易到处搬移,所以一时也想不到适合的光源。
2。配件,我没有透明物件可以使用(也不想买太贵的),所以也还在寻找适合的。
 
直到最近豁然开朗,想通了!所以很快就完成了!
 
以下是十分简易版DIY灯箱所需材料:
 
★ 透明塑料箱
 
☑ 购买时尽量找盖子表面平坦的,那么会比较容易进行活动
☑ 箱子尺寸不拘,你觉得适合的就可以了
 
★ LED便携式电筒
[话说某次家里突然停电,可是我们只有蜡烛。后来先生就提议买个LED便携式电筒。然后当我们在选购时我突然想到,这个,绝对是很好的光源!]
☑ 我的是购于Mr.DIY
☑ 如果和我一样怕孩子直视光源会对眼睛照成伤害,那么你可以将光源面面向旁边即可(参考上面的图片)
 
玩了几次灯箱游戏后,我真的觉得我开窍得太迟,这是太好玩咯!像日前我们再次进行冰上彩绘混色活动,可是就比之前有趣多。在黑暗中透过集中的光源能让我们更仔细观察。我们一起观察混色过程,透过光源是更加显著。还可以观察冰的结构。透过冰块也可以看到一些颜色颗粒,或是一些颜料在水上的波纹。这样看着,观察着,玩着,竟然进行了一个小时半以上~好吧,让我们一起准备更多活动吧!


** All Rights Reserved | NOT for Re-Sale | Files are for personal use ONLY | Please share the link to the blog and NOT the files, thank you! And for others resources that we get from others, we already linked it to the original post~ thanks all for sharing!
教材里面有些图片是取自网络,所以我们的打印教材只供个人用途,不能够转售或作商业用途~欢迎分享我们的教材,但是记得是连接到我们的部落格或面书,而非直接连接至教材哦~谢谢当中我们也提到了一些很好的资源,我们已经在文内直接连接至资源本文啦!也谢谢大家的分享! ^^


Saturday, 5 September 2015

[Craft Time] Cardboard Pizza 纸皮批萨

几天前拿到了一个很干净的大纸盒,想说可以做些什么好呢?应该可以做些特别企划(给孩子兵团),很久没有众乐乐了~后来想起之前看到纸皮 pizza 的手作,心里十分喜欢,就赶紧动手上网找披萨馅料的图,稍微修改整理就完成了(我的文件里可以做大概三到四个直径大概20cm的披萨)。饼皮就是从纸箱画圆剪下即可。大小皆宜的活动,大家可以在家尝试。如果真的没时间准备,或者想要更专业的填色活动,大家可以在George Da Art 那里报名上课哟!
 
Get a big carton box which is in good condition, and think of a cardboard pizza handcraft which i saw online before. Quickly, surfed for the toppings picture online and modified it and cut out four 20cm round shape as base. Those toppings inside my PDF file can use for three to four pizza(depend on how you fill your toppings). It is a great activity for kids in different age. And, here are our results(kids 3&4 years old). You may try yours now~ And  don't worry if you are too busy to prepare all of these, George Da Art will provide professional guidance for your little ones!

Free Printables:

Material is ready!
材料制作简单
 
 
** All Rights Reserved | NOT for Re-Sale | Files are for personal use ONLY | Please share the link to the blog and NOT the files, thank you! And for others resources that we get from others, we already linked it to the original post~ thanks all for sharing!
教材里面有些图片是取自网络,所以我们的打印教材只供个人用途,不能够转售或作商业用途~欢迎分享我们的教材,但是记得是连接到我们的部落格或面书,而非直接连接至教材哦~谢谢!
当中我们也提到了一些很好的资源,我们已经在文内直接连接至资源本文啦!也谢谢大家的分享! ^^

Monday, 2 February 2015

BCA010 Felt Numbering Set ✿ 不织布免裁剪数字套装

Felt material is just like a magician, it can attach among each others without any bonding agent in between. That's why many foreign mummy like to use it during the making of child activity set. But of course, if we could have something made by felt material, with educational function, it shall be perfect right? And Ibabiesclub bring you this Felt Numbering Set which is another item that you shall never missed out especially during early numeracy introduction period to your little one.

不织布材料就像一个魔术师,不需要任何贴纸,胶水,任何粘贴物,两张不织可以相互“吸引”。这就是为什么很多国外的妈妈们,喜欢在为孩子准备活动时使用它。不过,当然,如果我们能有什么用不织布制成的,具有教育功能,会是更完美的事吗?^^ 所以今天爱宝贝就为你带来了不织布免裁减数字套哦~ 


Width around 3.5cm, will have minor variation for different number.
宽度大概3.5cm ;每个数字会大略不同。


Height around 6.0 cm, will have minor variation for different number.
高度大概6.0 cm ;每个数字会大略不同。


0-9 & + - x /  ; random color
数字 0-9 及 加减乘除 ; 颜色随机


Counting activity with my gal during Valentine's Theme Play~
前几天用来进行数一数环节~


If you are interested on this, do email us : ibabiesclub@gmail.com. 若想订购可以通过电邮联络我们哦~
 OR
 just fill in our order form here /你也可以点击这里提交订购单哦 :

Product Code 产品编号: BCA010
Product Price :  RM5.00 

Courier Fee [Pos Laju,5g] : WM RM7 ; EM RM10

Sunday, 1 February 2015

爱宝贝自制传统福字手工红包 ✿ Free Printable Angpao from Ibabiesclub

就要迎接好福气的洋洋得意年哦~ XD 农历新年当然是要尽量向晨慢慢解释各种关于农历新年的由来,传说等,好让她能慢慢了解这个传统节日。这些资料尚在准备中,完成后会在爱宝贝的面书和大家分享~

先和大家分享我们自己制作的福字手工红包封。本来打算让孩子“画”春联,但是想到她目前的状况大概很难完成,左思右想的,就把福字拿来做红包封吧,制作完毕我还可以将它用来包红包给晨呢~那很有意义吧!然后赶快开工,完成后马上发给了两个创意妈妈,Winnie Chew 和 Bear Lim,请她们和孩子一起完成~那时正在赶时间,所以给她们的是初稿,可是她们是非常有创意的将它完成~谢谢Winnie & Bear Lim!

这个是Winnie和龙龙的作品,龙龙是四岁的细心男孩,小朋友独立轻松完成哦~赞!

看,龙龙十分认真呀!

这是Bear Mummy & Eva 的作品,有用棉花棒加上梅花哦~福气又带浪漫~
Bear Mummy 的部落格链接 :
http://bearlim.blogspot.com/2015/01/diy.html

现在给大家看看经过修改的红包DIY纸卡:

我们准备了福字版,再加空白版,任你发挥~

本来想让她“挥春”,可是真的太小很难进行~所以就用Glittering Pen让她填色。但是也是很难,基本上是晨大概挤了一堆,然后妈妈帮她补救~ XD 志在参与感染气氛! ^^

盖上指印
Add up 4 little finger prints~

然后指印变灯笼啦~ :)
Tada~ Done!

想要和孩子马上一起制作吗?这里给大家免费打印:
Here with free printable Angpao design from Ibabiesclub, do enjoy your DIY session!

爱宝贝福字自制红包封 (A4 Size)  Ibabiesclub Free Printable AngPao
爱宝贝空白自制红包封 (A4 Size)  Ibabiesclub Blank Free Printable AngPao


记得要和我们分享你们的作品哦~

祝大家羊年快乐得意福气满满! 

Monday, 19 January 2015

BAS006 DIY "Yang Yang De Yi" Hand Craft ✿ DIY 洋洋得意春节手作


Starting from Year of the Ram, most of the people will put some new year furnishing on their house. So Ibabiesclub has been prepare a DIY hand craft for this coming new year. Below are showing the DIY sheep hand craft design. You can DIY with your child and make a special new year furnishing, it will let you and your child surrounding feeling for the Chinese New Year. It will be a special New Year for your child.

在这羊年里,多数家里都会有贴上新年的贺词,吉祥物之类的摆设。我们ibabiesclub也特别为这一年一度的新年做了准备。以下这个是为了羊年而设的洋洋得意春节DIY的手工制作。您可和您的孩子一同DIY春节的吊饰,能让孩子感受春节的气息.


And this is how we assemble this lovely sheep~
以下简单介绍我们的制作流程吧!

Prepare : DIY Material Pack, Scissor & Double Sided Sticker
准备用具:洋洋得意手工包,剪刀,双面贴纸

I let Chen to take out all the pieces of puzzle
让小朋友自行将所有图片拆下

Let's play a matching game : Please take out all the parts which belong to the sheep
也可以进行配对游戏哦~我让晨将所有属于绵羊的纸片从中拿出来
Gather all the parts which is belong to sheep
把所有小部分收集齐了就可以开始粘贴

I'm trying to line up all the puzzle before start stick on the card. It to make sure all the puzzle in the properly place and not miss out any part.
我先试着排好说有的图片,以确保没有遗漏或弄错。

 Apply double sided sticker on it
将双面贴纸贴上

Completed the main part
主要部分完成~

I let her to apply double sided tape
这个贴上贴纸的部分可以让孩子们参与

As for the pasting part, i let her to do for those which is simple.
组合部分,就让她组合些容易的。

Yeah, this is my Baa Baa White Sheep!
可爱小绵羊头部完成!

Attach it to the paper plate with double sided tape also.
将头部和纸盘组合起来
Final, fix the nail compile the top and bottom.
最后将上面和下面的部分用事先准备好的钉子连接起来。

There are some extra flower shape card in balance, i let Chen to paste it by her own.
包装有附送了多出了的花形纸卡,我让晨自由粘贴。

Done!
完成咯~


If you are interested on this, do email us : ibabiesclub@gmail.com. 若想订购可以通过电邮联络我们哦~
 OR
 just fill in our order form here /你也可以点击这里提交订购单哦 :

Product Code 产品编号: BAS006 
Product Price :  RM9.00 
Courier Fee [Pos Laju, 100g] : WM RM6 ; EM RM10

Sunday, 18 January 2015

BAS007 DIY "Nian Nian You Yu" Hand Craft ✿ DIY 年年有余春节手作


Starting from Year of the Ram, most of the people will put some new year furnishing on their house. So Ibabiesclub has been prepare a DIY hand craft for this coming new year. Below are showing the DIY fish hand craft design. You can DIY with your child and make a special new year furnishing, it will let you and your child surrounding feeling for the Chinese New Year. It will be a special New Year for your child.

在这羊年里,多数家里都会有贴上新年的贺词,吉祥物之类的摆设。我们ibabiesclub也特别为这一年一度的新年做了准备。以下这个是为了羊年而设的年年有余春节DIY的手工制作。您可和您的孩子一同DIY春节的吊饰,能让孩子感受春节的气息.


Below are showing the step with my little helper.
以下会是一些基本步骤和我的小帮手。

Firstly, I ask my little helper to help me to take out all the pieces of the puzzle.
首先我请我的小帮手把一片片的图片分开。

He very careful to take it out piece by piece.
他很小心翼翼的将图片拔出来。

 It's look so concentrate doing his part.
看他很专心的在做着。

 I'm doing my part when little helper still doing his part. I use double-sided tape, so I stick all the double-sided tape on behind of the each puzzle. If you want to make it as 3D feel so you can use thick double-sided tape. It will look more vivid.
当小帮手很专注的做他的部分时我开始做我的部分了。我用双面胶纸把要粘部分的背面给贴好。如果你要做3D及看起来生动些,可以选择较厚的双面胶纸。
Now start to stick the puzzle. 开始把图片给贴上咯。


I'm trying to line up all the puzzle before start stick on the card. It to make sure all the puzzle in the properly place and not miss out any part.
我先试着排好说有的图片,以确保没有遗漏或弄错。

Done for the partial. 完成了一部分。

Final, fix the nail compile the top and bottom.
最后将上面和下面的部分用事先准备好的钉子连接起来。

Turn to back side and fix properly. 翻去后面将钉子固定好。 


Finally completed. 完成咯。

Wish you Happy New Year and wish you will like it. Bring it back to your home to décor your house.
祝你新年快乐,希望你会喜欢以上的解说。同时把它也带回家为自己的家增添些气氛。


If you are interested on this, do email us : ibabiesclub@gmail.com. 若想订购可以通过电邮联络我们哦~
 OR
 just fill in our order form here /你也可以点击这里提交订购单哦 :

Product Code 产品编号: BAS007
 Product Price :  RM9.00 
Courier Fee [Pos Laju, 100g] : WM RM6 ; EM RM10